The arrangement
Work with tracks and folders, the rulers, the playhead, locators and loop, the grid, the editing tools, clips and containers, and the hold-Q edit menu.
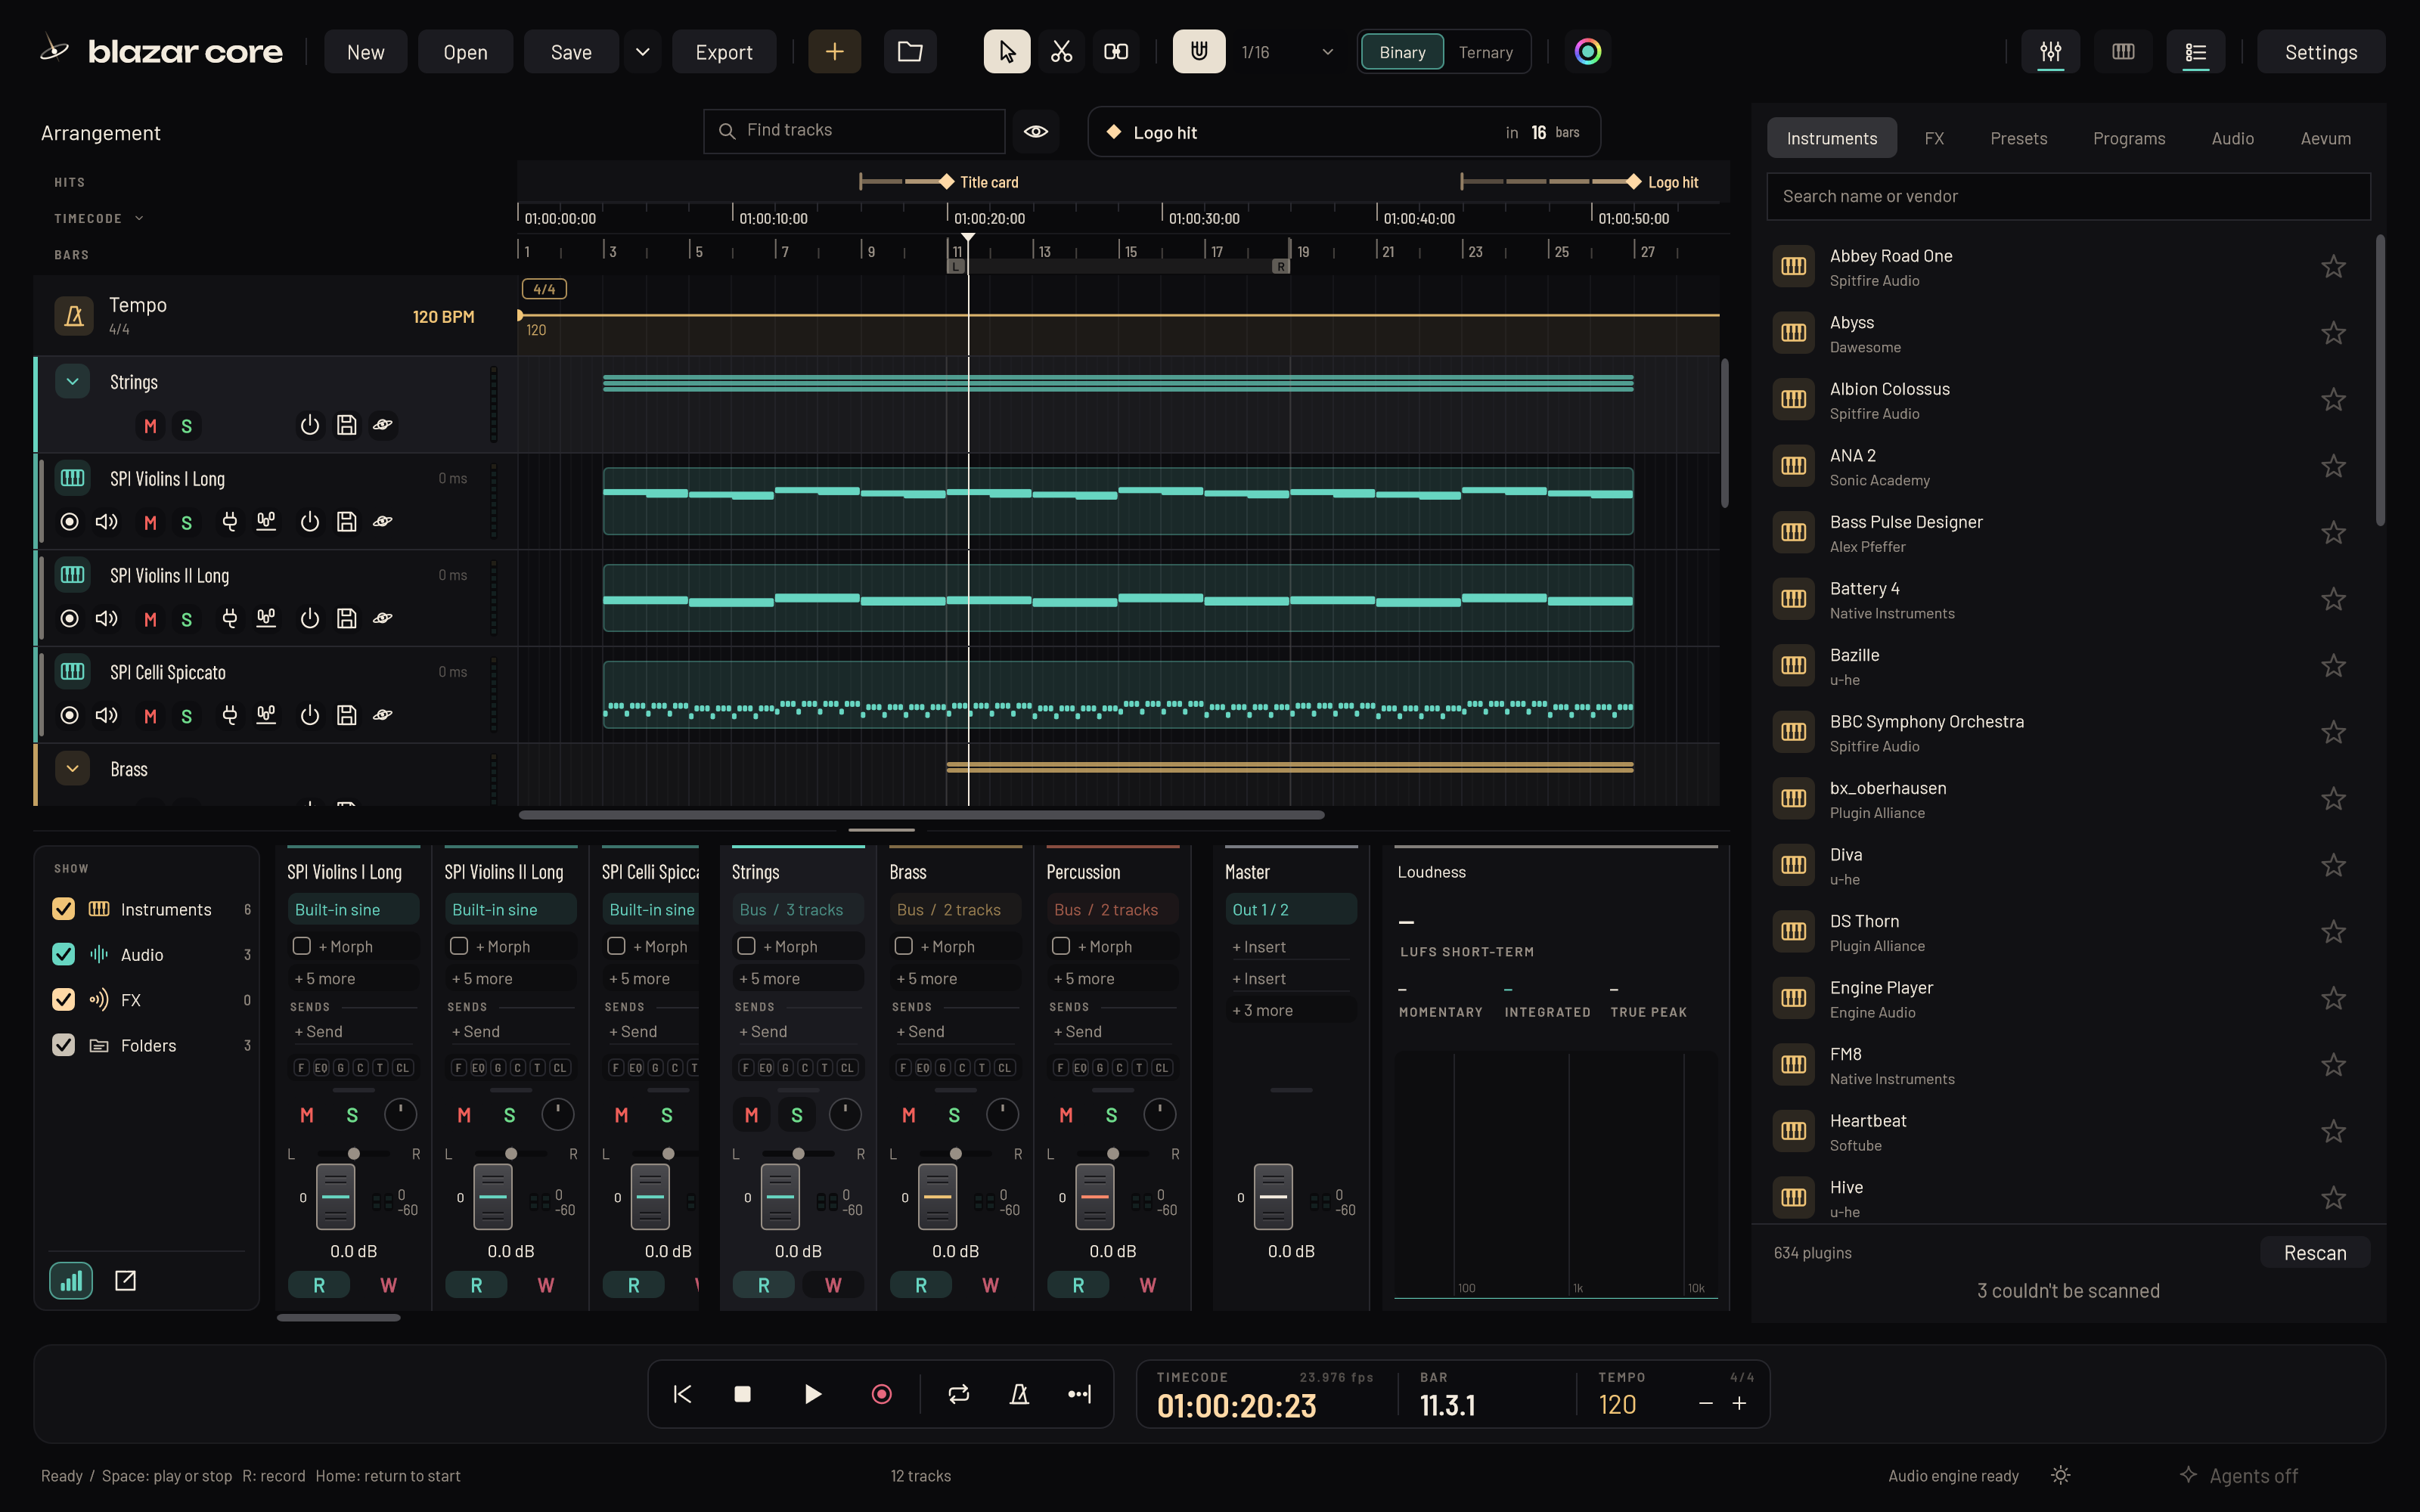
The arrangement is where your cue takes shape: tracks top to bottom, time left to right. This chapter covers tracks, moving around, and editing clips and MIDI containers on the timeline.
Kinds of tracks#
- Audio tracks hold audio clips: recordings, imported files, stems.
- Instrument tracks hold MIDI containers and play a VST3 instrument such as Kontakt.
- Sampler tracks play Kilonova, Blazar Core's own sampler.
- Folders group tracks. A folder is also a bus in the mixer: the tracks in it play through it.
- FX channels take sends from other channels, typically for reverbs and delays. You make them with Add track > FX channel, or from a channel's + Send row (see The mixer).
A video, when you import one, gets its own lane under the tempo track (see Tempo and picture).
A session holds up to 1024 tracks.
Add tracks#
- Click Add track in the top bar and choose Folder, Audio track, Instrument track, Sampler track or FX channel. In a narrow window, the same choices sit under one + key.
- A new instrument track opens the plugin picker, so you can choose its instrument straight away.
- Hold Q over the arrangement with nothing selected: the edit menu offers a new Audio track, Instrument track or Folder.
- Drag an instrument, a Kontakt program, a track preset or an audio file from the browser onto empty arrangement space (see Instruments, Kontakt and the browser).
- Press Ctrl+G to put the selected track into a new folder.
The track header#
Each track's header holds its controls. Not every track shows all of them, and compact rows show fewer.
- The badge with the track's colour. Click it for the colour picker.
- The name. Double-click it to rename the track.
- Arm (the circle) chooses whether the track records. Listen (the speaker with waves) turns on live monitoring. Mute (the crossed-out speaker) and Solo (the headphones).
- The track delay at the right of the name, for example "-120 ms", shifts the track in time (see Track delay).
- The automation chip beside the track's type sets its automation mode (see Automation).
- The instrument name on instrument tracks opens the instrument's window. A new instrument track shows Load instrument... instead.
- The articulation chip shows the articulation in use when the instrument's key switches are learned (see Key switches).
- The input button and the audio editor button on audio tracks.
- The Takes chip on audio tracks that were loop-recorded (see Loop recording).
- Beneath the badge: the power key (disable the track), the save icon (save a track preset) and the Event horizon key (show this track alone, see Event horizon).
Right-click a track's header for more, including its colour.
Select, delete and duplicate tracks#
- Click a track header (or a mixer strip) to select the track.
- Ctrl+click adds a track to the selection or removes it; Shift+click selects a range of tracks.
- S, M and Y solo, mute or turn on Listen for the selected tracks.
- Delete removes the selected tracks, after you click a track header or mixer strip, as one undo step. Ctrl+Z puts them back, plugins included.
- Shift+D duplicates the selected tracks right under them, with their clips, notes, plugins and sends. A folder is duplicated with its tracks.
Colour tracks, containers and clips#
Click a track's badge (or right-click its header) for the colour picker: 64 colours through the spectrum, 15 hues and greys, each from light to deep.
The colour key in the top bar (the ring of colours after the tools and grid) colours whatever is selected: the selected MIDI containers, else the selected audio clip, else the selected tracks. A container or clip with its own colour keeps it when you cut, move or process it. Use the track's colour gives it its track's colour again. Colours are saved with the project, and each change is one undo step.
Find tracks#
In a big template, type in Find tracks (Ctrl+F) in the arrangement heading, for example "horns" or "strings". The arrangement and the mixer show only the tracks whose name, instrument or effects match. Press Esc in the search field to see every track again.
The eye button beside the field switches between showing all tracks and showing only tracks with content (clips or notes).
Zoom and track height#
- W and E zoom out and in. In an open editor, they zoom the editor.
- Ctrl+wheel zooms around the pointer; Shift+wheel scrolls through time.
- Shift+W and Shift+E make every track shorter or taller, from a slim 24-pixel line (badge, name, arm, mute and solo) up to 600 pixels.
- Z enlarges the selected track to most of the arrangement in view, while the others keep their height. It follows as you select other tracks. Press Z again and all tracks return to one height. In the mixer, the same key opens the selected channel's channel strip.
- Shift+F (zoom full) shows all your work: the whole song across, to the end of the last clip, container or note, and every track in view at one height. If there are more tracks than fit even at the slimmest height, the view starts at the top and the status line says so. Over the piano roll, Shift+F fits the roll to its container instead.
The rulers#
From the top, the rulers are:
- HITS, the hit lane, for hit points in the picture (see Hit points).
- The time ruler, reading TIMECODE (hh:mm:ss:ff) or TIME (minutes, seconds and milliseconds). Click its name to switch. Clicking the time readout in the transport does the same, and both always switch together.
- BARS, the bar ruler, with the left and right locators.
- The tempo track, right under the bar ruler (see The tempo track).
The bar ruler marks each bar's start with a tick, its number just to the right, and shows the beats when you zoom in. The playhead shows on it as a small marker.
On a small screen the hit lane folds onto the time ruler.
Place the playhead#
- Click the bar ruler. As you hover, a line shows where the click will put the playhead, with its bar.beat.sixteenth position. Within a few pixels of a bar line, the click lands exactly on the bar's start, at any zoom. Elsewhere it lands on the grid while the magnet is on.
- Click empty arrangement space. This works the same way as a click on the bar ruler.
- Click or drag on the time ruler to place or scrub the playhead.
- Home, or the return-to-start key, goes back to the very start.
- On the numeric keypad, 1 and 2 jump to the left and right locator, - and + move one bar back or forward, and 0 stops and goes to the left locator; press it again there to go to the very start.
With the magnet on, every way of placing the playhead follows the grid: the bar ruler, the time ruler (a click or a scrub), the piano roll and the audio editor. With the magnet off, the time ruler and the editors put the playhead exactly where you click.
Space plays and stops; Numpad Enter also plays.
The transport shows the playhead as timecode (or minutes and seconds, following the time ruler) and in bars as bar.beat.sixteenth, with the tempo at the playhead.
Set the locators and loop#
The L and R locators sit on bar lines in the bar ruler. They mark the range for looping, for cutting and inserting time, and for exporting part of the song.
Set the locators#
- Drag across the bar ruler to set both locators.
- Drag L or R to move one of them.
- Ctrl+click either ruler to put the left locator on the nearest bar line, or Alt+click for the right one. The playhead doesn't move.
- Press P to put the locators around the selected MIDI containers (or the selected audio clip). This also turns the loop on.
A plain click on the bar ruler still moves the playhead.
Loop#
Turn the loop on or off with the loop button in the transport, with /, or by double-clicking the locator range. Playback then repeats between the locators, jumping back exactly at the right locator. Recording loops too (see Loop recording).
The locators and the loop are saved with the session.
The grid and the magnet#
- J turns the grid magnet (snapping) on or off.
- Ctrl+1, Ctrl+2, Ctrl+3 and Ctrl+4 choose a grid of 1/4, 1/8, 1/16 or 1/32. The grid list in the top bar has the same choices.
- T, or the Binary | Ternary switch beside the grid, switches between a straight and a triplet grid.
While the magnet is on, moving, trimming and splitting clips and containers, adding points and hit points, and placing the playhead all land on the grid.
The three tools#
Next to "Arrangement" in the top bar are three tools:
- Select (key 1) selects, moves, trims and fades.
- Split (key 2, the scissors) cuts: click inside an audio clip or MIDI container to cut it there, on the grid when the magnet is on.
- Glue (key 3) joins the clip or container you click with the next one on its track.
Work with clips and containers#
Audio lives in clips on audio tracks. MIDI lives in containers on instrument tracks; an instrument track can hold as many containers as you like.
Select and open#
- Click a clip or container to select it.
- Ctrl+click or Shift+click adds another, on any track, or takes it out again.
- Ctrl+A selects every MIDI container and audio clip in the arrangement.
- Press Enter or double-click a container to open it in the piano roll. Press Enter again to close it.
- Press Enter or double-click a clip to open it in the audio editor. On a track with an ARA plugin such as Melodyne, a double-click opens the plugin on the clip instead.
Move and copy#
- Drag a clip or container to move it along the timeline, or onto another track of its kind. It snaps to the grid while the magnet is on.
- Alt+drag copies it instead; the original stays where it was. You can hold Alt before you start dragging or press it on the way. Let go of Alt before you drop and it moves after all.
- D duplicates the selected containers or clip right after themselves. Press it again for the next copy.
Where audio clips overlap, the one on top plays. A clip you move or record goes on top. The clip underneath is kept, so moving the top one away brings it back.
Split, trim and delete#
- Ctrl+E splits the selected clip or container at the playhead. The left part of an audio clip keeps the fade-in and the right part the fade-out.
- With the Split tool, click where you want the cut.
- Right-click a clip for Split here, Split at playhead and Delete clip.
- Delete (or Backspace) removes what is selected.
- To trim an audio clip, drag its left or right edge, below the fade squares. Trims snap to the grid when the magnet is on.
Cutting a MIDI container never changes how it sounds: each note belongs to the part it starts in.
All clip edits are non-destructive. The recorded file never changes, you can undo a trim by dragging the edge back out, and every drag, split, move and delete is one undo step. For fades, crossfades and clip gain, see Audio editing.
Glue#
Click a clip or container with the Glue tool to join it with the next one on its track.
- Split parts simply rejoin.
- Other audio clips are rendered, as they sound, into a new recording. The original files stay on disk.
- With several clips or containers selected, clicking one of them glues the whole selection: each track's selected clips or containers become one, including whatever lies between them. This is one undo step. The edit menu's Glue does the same.
Select with a rectangle#
With the Select tool, drag from empty lane space to draw a rectangle. You can start in the space below the tracks, or in the video lane.
- The tracks it crosses, and the MIDI containers, audio clips and video it touches, are selected.
- Enter opens the selected containers in the piano roll, together, even across several tracks.
- Delete removes what is selected; Glue joins it.
- Hold Ctrl or Shift to keep the tracks you had selected before.
A plain click on empty space still moves the playhead.
Move several things at once#
- Select clips, containers and the video with a rectangle, or Ctrl+click / Shift+click each, on any tracks.
- Drag any one of them. They all move by the same amount of time, and a preview shows where each will land.
They also move up or down by as many tracks as the one you hold, as long as each one lands on a track of its kind; otherwise they move in time only. Alt copies them all. The move is one undo step, and everything stays selected.
Pressing on something already selected keeps the whole selection. A click without dragging selects just that one item.
Cut and insert time#
Use these to make room in a cue, or to take a section out, across every track at once.
- Cut time (Ctrl+Shift+X) takes the time between the locators out of every track. Clips and MIDI containers are cut at the locators, and the notes, controllers, automation and tempo changes after the range move up to close the gap.
- Insert time (Ctrl+Shift+E) inserts silence as long as the locator range at the left locator. Whatever sits there is cut, and everything after it moves later.
Controller data is split at the seams just like notes: a pedal, bend or controller keeps the value it had on each side, and a sustain pedal held across an insert lets go at the gap and goes down again after it.
Both commands are also in the right-click menu of a ruler and in the edit menu when nothing is selected. Each is one undo step. Hit points stay with the picture: they keep their time when bars are cut or inserted.
The edit menu (hold Q)#
Hold Q and a round menu opens at the pointer with what you can do to the selection. Point at a slice and let go of Q. Or tap Q to keep the menu open, and click a slice.
A MIDI container offers:
- Quantize (Shift+Q does it directly).
- Align to the click (see Align).
- Humanize: the starts of its notes loosened within the piano roll's Humanize range (+/-10 ms unless you changed it). Over the piano roll, it works on the notes selected there, else all the notes it shows.
- Bounce to audio: rendered offline through its instrument and effects onto a new audio track right under it.
An audio clip offers:
- Reverse.
- Normalize: clip gain set so the peak sits at -0.1 dB.
- Pitch shift: in semitones and cents, keeping the formants if you ask it to.
- Fit to bars: stretched to the nearest whole number of bars with warp markers, keeping the pitch.
- Invert polarity.
Several selected clips or containers offer Glue.
With nothing selected, the menu offers Cut time and Insert time (between the locators) and a new Audio track, Instrument track or Folder.
Every edit from the menu is one undo step.
Bring in audio, MIDI and more#
- Import audio or video in the top bar places an audio file on the selected audio track at the playhead, or on a new audio track when none is selected. It also imports video (see Work to picture).
- Drag files straight in from Explorer or the Finder:
- Audio files land where you drop them on an audio track. Dropped on empty space, they go onto new tracks, one per file, lined up, so a folder of stems comes in ready. With several files, Blazar Core asks whether you want them on one track, one after another, or on a track each, all starting at the same time.
- A MIDI file puts its notes on the instrument track you drop it on, or makes a named instrument track for each of its parts.
- A session opens.
- A track preset adds its track.
- A Kontakt program (
.nki) loads into the instrument track you drop it on, or into a new Kontakt track.
- The browser offers instruments, effects, presets, Kontakt programs and the audio files on your drives (see The browser).
Something unclear or missing? Tell us, or report a bug.