Getting started
Install Blazar Core on Windows or the Mac, activate it, set up your audio interface and MIDI keyboard, and find your way around the window.
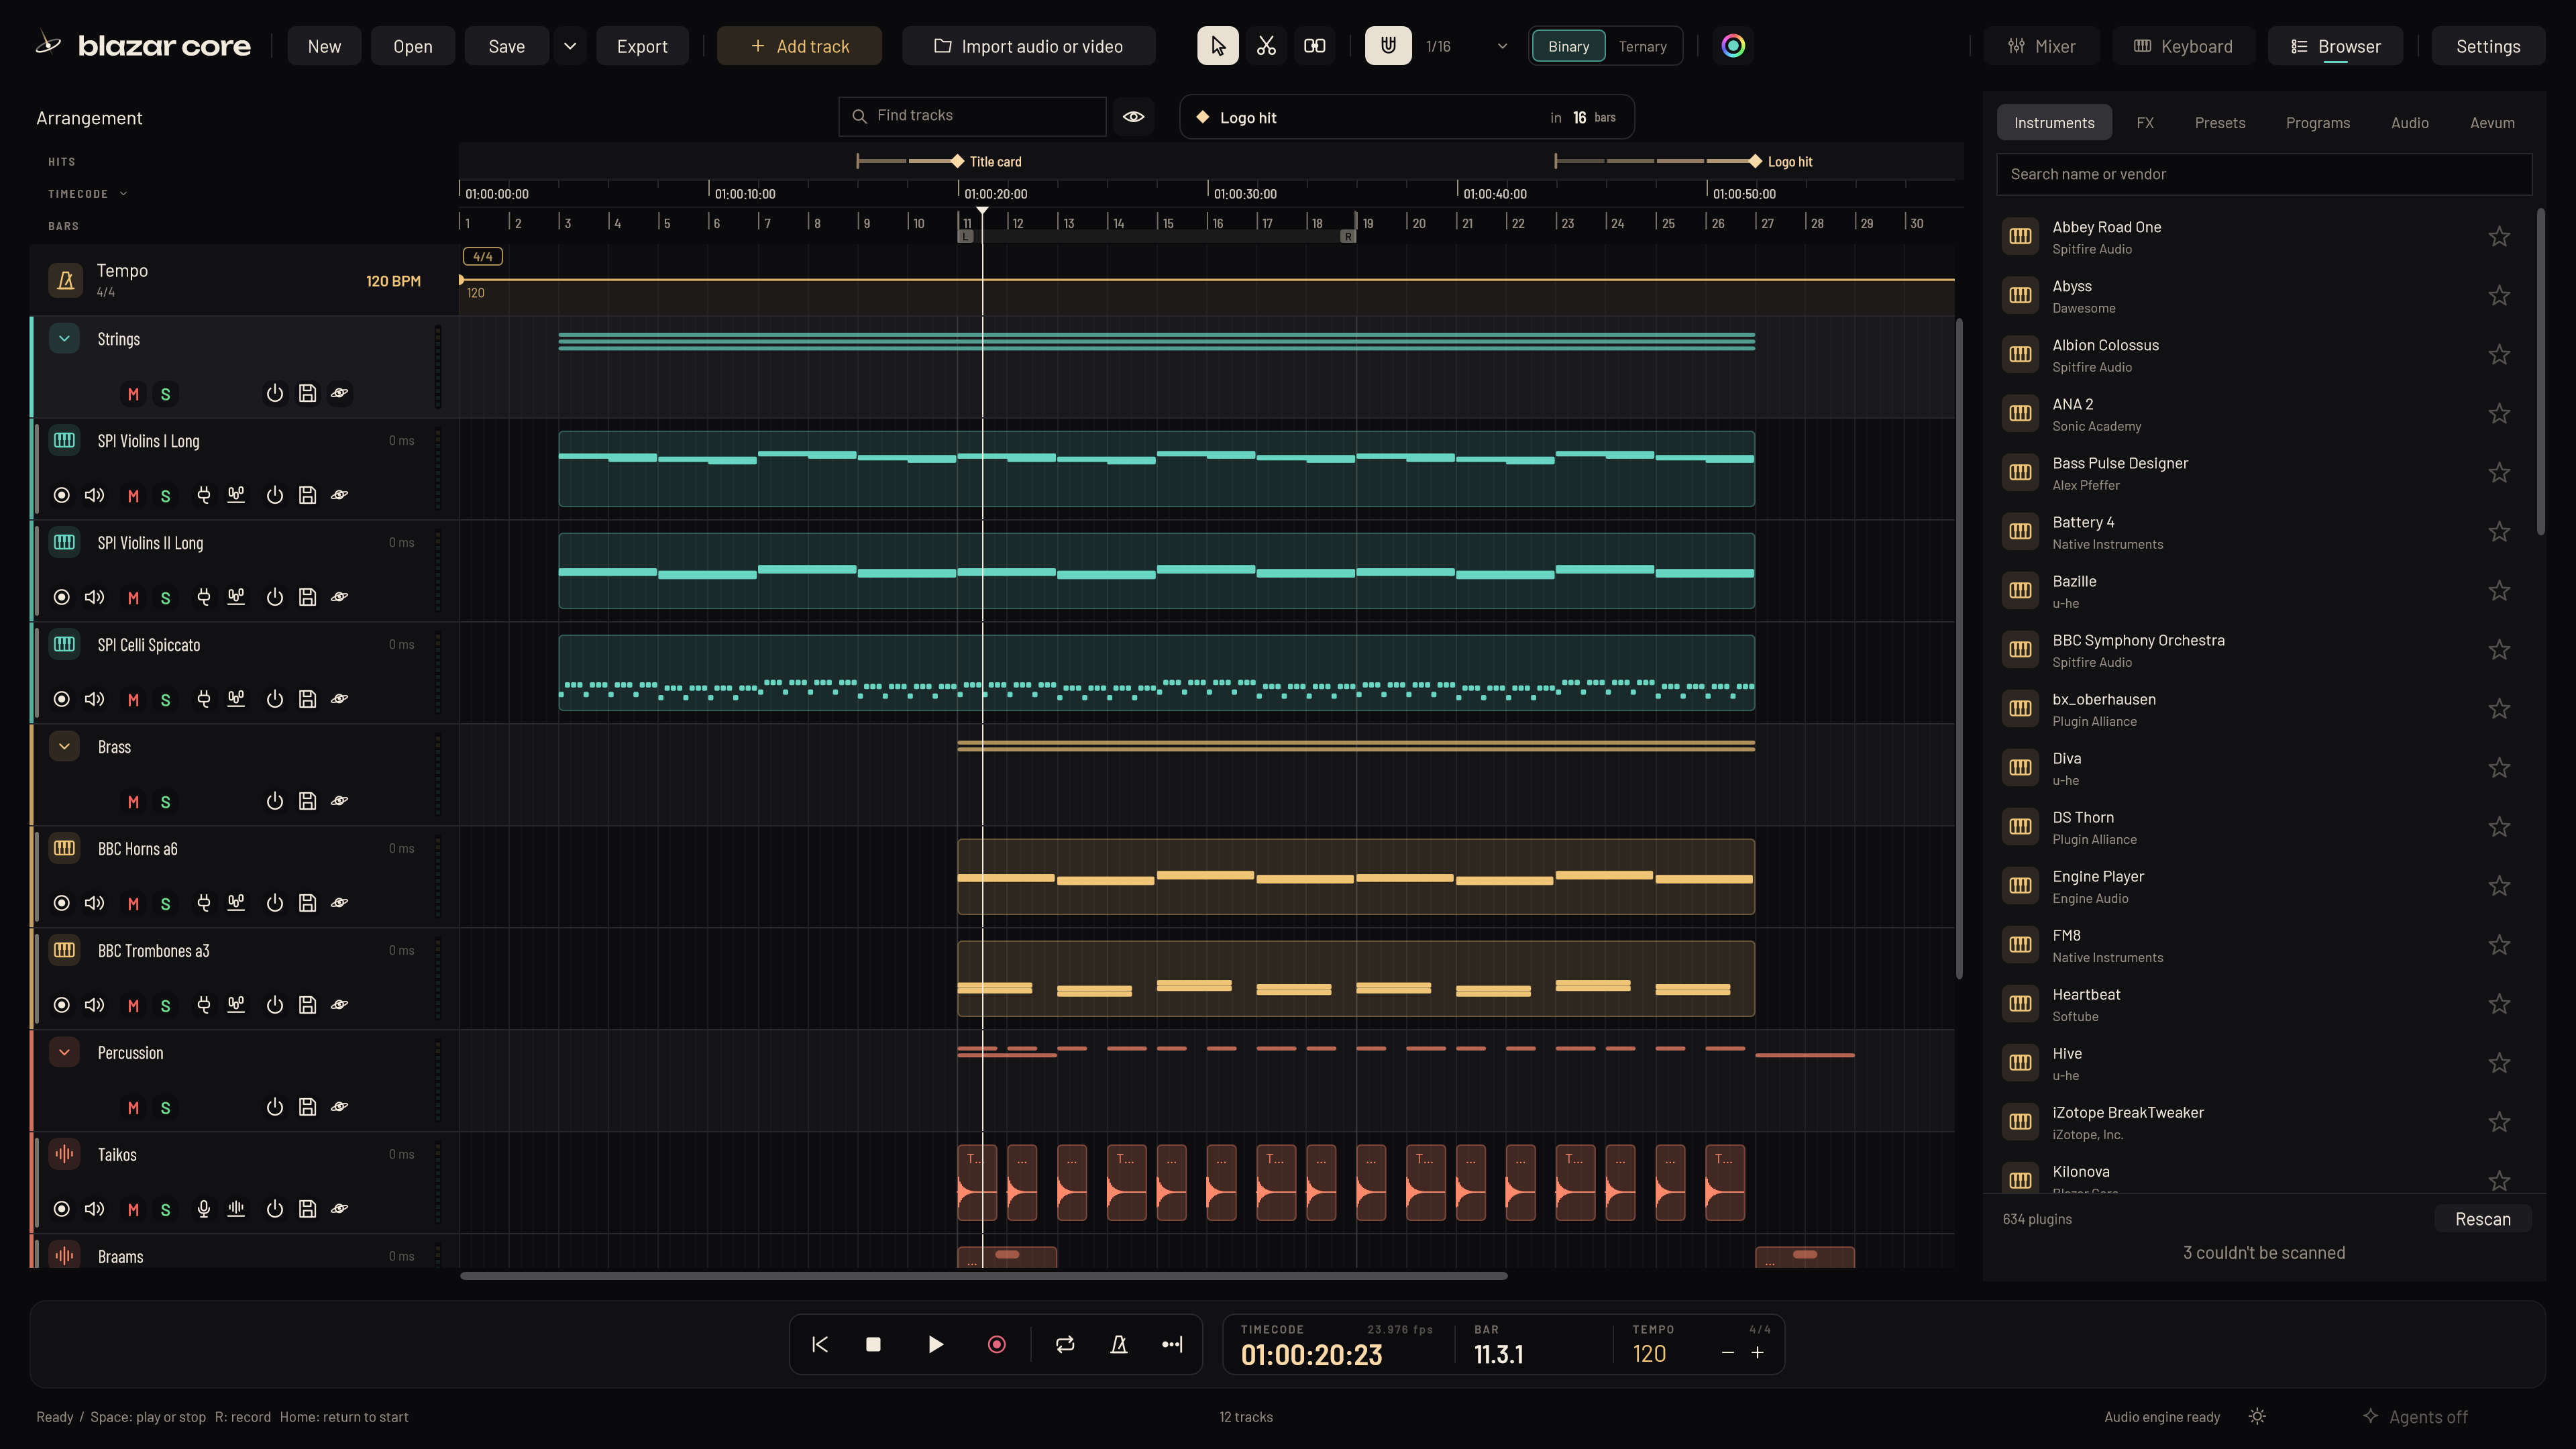
Blazar Core is a workstation for film, trailer and media composers. It runs on Windows and the Mac from the same code, so a session made on one opens on the other. This chapter takes you from the download to your first sound.
System requirements#
- Windows: Windows 10 or later, 64-bit.
- Mac: macOS 12 or later, on Apple Silicon or Intel.
- Plugins: 64-bit VST3 instruments and effects, and ARA 2 plugins such as Melodyne. VST2 plugins are not hosted. On the Mac, Audio Units are not hosted yet.
- Audio: ASIO or Windows audio on Windows, Core Audio on the Mac.
Install on Windows#
- Run the installer you downloaded (
BlazarCore-<version>-x64-setup.exe). - Windows SmartScreen may warn you, because the installer is not code-signed. Click More info, then Run anyway.
- Choose whether you want a desktop shortcut, and whether double-clicking a
.blazarsession should open it in Blazar Core. - At the end, the installer offers to start Blazar Core for you.
Blazar Core installs for all users into Program Files\Blazar Core and adds a Start menu shortcut. The program is a single file with everything it needs built in, so there is no extra runtime to install. You can remove it from Apps & features like any other program.
When you update or uninstall, your settings, license key, plugin list and projects stay where they are. If Blazar Core is running when you install an update, the installer asks you to close it first.
Install on the Mac#
- Open the disk image and drag Blazar Core into Applications, then open it there.
- Because the app is not signed with an Apple developer certificate yet, macOS says it cannot verify Blazar Core. Click Done.
- Open System Settings > Privacy & Security, scroll down to the message that Blazar Core was blocked, and click Open Anyway.
- Confirm with Open (and your password if asked).
From then on it opens like any other app. macOS asks again once for each new version. The disk image carries these steps as First launch.txt, in case you need them again.
On the Mac, your settings live in ~/Library/Application Support/Blazar Core and your projects in ~/Documents/Blazar Core Projects. VST3 plugins are found in /Library/Audio/Plug-Ins/VST3 and ~/Library/Audio/Plug-Ins/VST3.
Activate your license#
The full version is activated with the license key from your receipt: one line of text. The key is checked on your computer. Activation never goes online, and nothing else is sent anywhere.
- Start Blazar Core. Until a key is in, the window shows the activation screen.
- Paste the key and press Activate. You can also drop your license file anywhere on the screen.
A key for another product, an expired key or a mistyped one is refused, and Blazar Core tells you why.
Blazar Core keeps the key in its data folder as license.key. To see your license, open Settings > License: it shows the version, your license and where your settings are kept. Remove license... deletes the key from this computer and returns to the activation screen. Your sessions stay where they are.
Lost your key? Visit store.alexpfeffer.com/support.
The demo version#
The demo is the whole of Blazar Core except for two things: it cannot save a session and it cannot export audio. Play your instruments, arrange, mix, and try every effect and Jet, the built-in agent.
When the demo starts, a card says so, with Buy Blazar Core, I have a key and Start. When you reach for something the demo leaves out, the card comes back to tell you ("Saving is in the full version", "Exporting is in the full version"). Not now closes it. Settings > License has Buy or unlock... for later.
Unlock the demo#
You don't need to download anything by hand to go from the demo to the full version.
- Click Buy Blazar Core. The store's checkout opens in your browser.
- After buying, click the store's Unlock button, or come back to the demo, click I have a key, paste the license key from your receipt and click Unlock.
- The card shows each step: Blazar Core checks your key with the store, downloads the full version, checks the download and installs it. On Windows you confirm the installation once at the permission prompt; on the Mac it goes into your Applications folder.
- The full version opens, already activated, and the demo removes itself.
You can stop the unlock at any time. Your key is kept, so you can unlock again whenever you like.
Tell Blazar Core your name#
The first time the start screen opens, it asks for your first name. Blazar Core uses it to greet you on the start screen, Jet greets you with it, and Aevum (the session time tracker) says hello for the time of day. Click Not now to skip; you won't be asked again. You can change it later in Settings > General, under Your name.
Set up audio and MIDI#
- Open Settings > Audio and MIDI. You can also click Out 1 / 2 on the master strip in the mixer.
- Choose your audio device. On Windows, choose ASIO in the Audio device type list to use your interface's ASIO driver (an RME Fireface or a RODECaster Pro, for example). Nothing else needs to be downloaded for ASIO support.
- Choose the output and the input channels you want to use, the sample rate and the buffer size.
- Tick the MIDI inputs you play from.
Blazar Core remembers the driver, channels, sample rate, buffer size and MIDI inputs, and restores them at the next launch. It does not install hardware drivers: install your interface's own driver first.
While the song plays or records, the device stays as it is. Stop first if you want to change it.
The same page shows the audio load and the processor cores the tracks are rendered on, and has the switch for Slipstream, which protects playback from CPU spikes (see Performance).
Find your way around the window#
Blazar Core keeps everything in one window, with editors docked where you need them.
- The top bar runs along the top. New, Open and Save sit beside the logo, with the menu of other ways to save and the Export key. Next come Add track (a folder, an audio track, an instrument track, a sampler track or an FX channel) and Import audio or video; in a narrow window they sit under one + key. In the middle are the three editing tools (Select, Split, Glue), the grid and its magnet, the colour key and, when it has something to offer, the snowflake key for Cryosleep. At the right end are the Mixer, Keyboard and Browser keys, which show or hide those parts of the window, and the Settings key.
- The arrangement fills the middle. Track headers sit on the left, their lanes to the right. Above the lanes are the rulers: the hit lane, the time ruler (timecode or minutes and seconds), the bar ruler with the locators, and the tempo track. A video, when you import one, gets its own lane right under the tempo track. The arrangement heading holds Find tracks and the countdown to the next hit point.
- The browser sits on the right, with its tabs for Instruments, FX, Presets, Programs, Audio and Aevum. F4 (or the Browser key) shows or hides it.
- The editors (the piano roll and the audio editor) open docked under the arrangement when you open a MIDI container or an audio clip.
- The mixer sits below the arrangement. F3 (or the Mixer key) hides or shows it.
- The transport runs along the bottom: play, stop, record, return to start, loop, the metronome and the count-in, and readouts for the playhead in timecode and in bars, the tempo, and more.
- The status line at the very bottom shows messages and the audio load. At its right end are the sun or moon key for the Daylight theme and the agents key.
The session name is shown in the middle of the window's title bar. An asterisk beside it means there are unsaved changes.
Hover over almost any control to see a tooltip with what it does. Hover over a shortened track or plugin name to read it in full.
The Settings window#
Everything you can set lives in one window, opened with the Settings key at the right of the top bar. Its pages run down the left:
- General: your first name, the look (Dark or Daylight), autosave and continuous saving, Auto align for MIDI takes, automatic delay compensation for sample libraries, agent access, and the folders for projects, templates and track presets. Change... moves a folder; Show opens it.
- Audio and MIDI: the audio interface, sample rate, buffer size and MIDI inputs, the audio load, and Slipstream.
- Keyboard shortcuts: every shortcut, with a search field. F1 opens Settings on this page.
- Features: what Blazar Core does beyond the usual (Cryosleep, the mixer zoom, Event horizon, linked faders, Align, the video, Blazar Core's own effects and more), each with how to reach it, and a search.
- Support: report a bug or request a feature, and find the log file (see Troubleshooting).
- License: the version, your license, and where your settings are kept.
Keyboard shortcuts in this manual#
Shortcuts in this manual are written as they are on Windows. On the Mac, use Cmd where this manual says Ctrl. Alt is the Option key on a Mac keyboard.
This manual mentions the most useful shortcuts where they belong. The complete list is on its own page, and in the app under Settings > Keyboard shortcuts (F1).
Undo anything#
Almost every change in Blazar Core is one undo step: edits, moves, mixer changes, effect moves, imports, even the changes an agent makes for you. Press Ctrl+Z to undo and Ctrl+Y (or Ctrl+Shift+Z) to redo.
Something unclear or missing? Tell us, or report a bug.