The mixer
Balance your tracks with faders, gain trim and linked faders, add insert effects and sends, blend effects with Morph, use the built-in channel strip, and read loudness on the master.
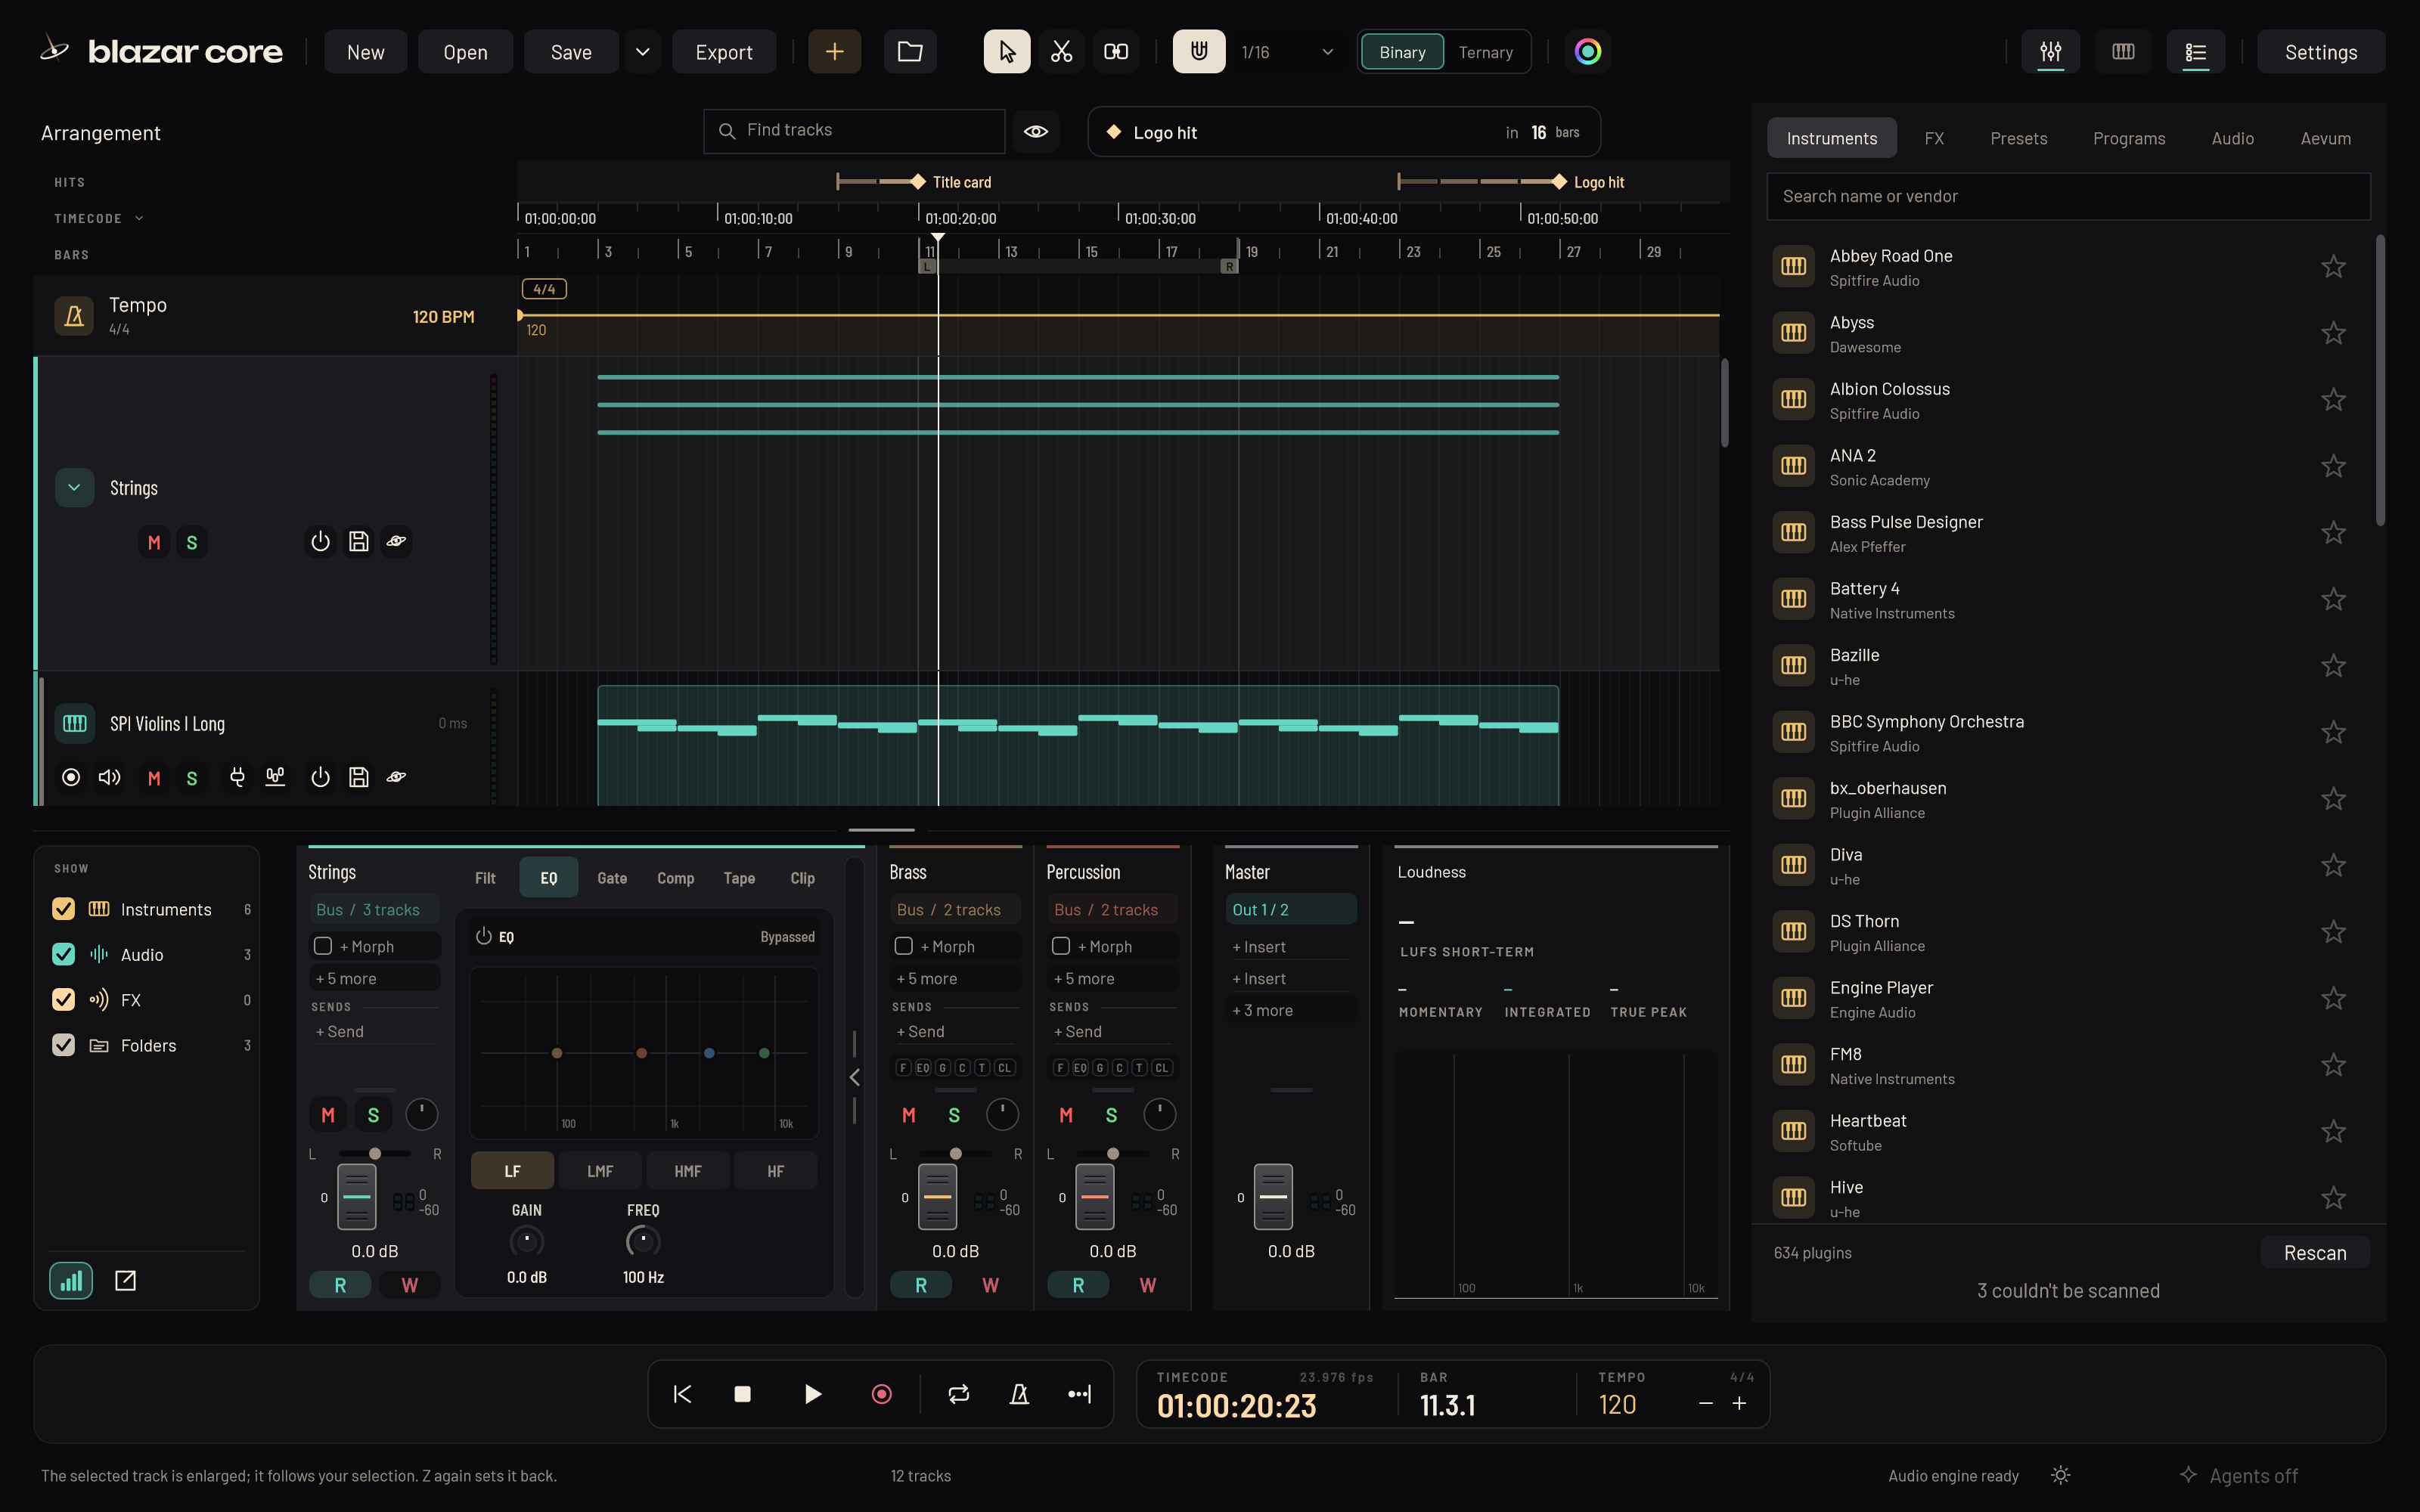
The mixer sits under the arrangement, one compact strip per channel: instrument and audio tracks, folder buses, FX channels and the master at the right end.
Show, hide and size the mixer#
- Press F3, or click the Mixer key in the top bar, to hide the mixer and give the whole workspace to the arrangement. Press it again to bring the mixer back.
- Drag the divider between the arrangement and the mixer to share the space. Double-click it to reset it. Blazar Core remembers the position. With the divider focused, Up and Down move it and Home resets it.
- The arrangement always keeps room for at least two tracks. On a short mixer, insert slots that don't fit are listed under + N more, and faders never grow beyond 40% of the screen's height.
Put the mixer on another monitor#
Click the own-window key at the foot of the mixer's sidebar, or press Shift+F3, to put the mixer in its own window. Close that window (or press Shift+F3 again) to put it back. Blazar Core remembers the choice.
Choose which channels show#
The sidebar at the mixer's left lists Instruments, Audio, FX and Folders, each with a tick box in its colour and how many the session has. Untick one to hide those channels from the mixer; the arrangement keeps them. The choice is kept for next time.
Find tracks (Ctrl+F) filters the mixer too, and Event horizon shows a single channel, zoomed.
Name and select channels#
- Double-click a strip's name to rename the channel, folder bus or FX channel, just as in its track header.
- Hover over a shortened track or plugin name to read it in full.
- Click a strip to select its track. Ctrl+click or Shift+click strips (on the name, the fader, the level readout or the meter, anywhere but the keys) to select several.
Faders and pan#
- Faders don't jump. Grab a fader or pan control anywhere and it moves from where it is as you drag. A click never changes a level, and a Ctrl+click or Shift+click on a fader only selects its channel.
- Double-click a fader for 0 dB, or a pan control for the centre.
- Faders run from silence to +6 dB.
The fader scale#
As on a console, the faders give you the most travel around 0 dB, where a mix is set, and less towards the bottom. 0 dB sits at 84% of the travel, -12 dB halfway, and -30 dB at a fifth. The scale beside each fader marks +6, 0, -6, -12, -20, -30, -40, -50 and -inf.
Move several faders at once#
Select several channels (Ctrl+click or Shift+click mixer strips or track headers), then move any one of their faders. The others move in proportion along their travel, so the mix stays a mix:
- Pulled down, each keeps its share of the way to the bottom, and they all reach -60 at the same moment.
- Pushed up, each keeps its share of the way to the top, and they all reach +6 together.
- Back where you started, every channel is where you mixed it, even in a later drag, as long as you don't move one of them on its own in between. (If you do, the channels as they are become the new mix.)
Gain trim#
The small knob beside M and S on every channel sets the channel's level at its input, before its inserts, from -24 to +24 dB. Use it to lift a library that was recorded quietly before it reaches your plugins, or to change a channel quickly while its fader is automated.
- Drag the knob up or down. Double-click it for 0 dB.
- It lights teal from 12 o'clock as far as it is turned. While you turn it, the level readout under the fader shows the trim.
- With several channels selected, they trim together.
The trim is saved with the session and can be undone. Exports, bounces and Cryosleep keep it.
Mute and solo#
- Mute silences the track's output, even if the track is soloed.
- When any track is soloed, only soloed, unmuted tracks reach the master. FX channels keep playing while you solo, so a soloed track keeps its reverb.
You can see at a glance what you are not hearing:
- While something is soloed, the M key of every track the solo silences is tinted red with a red outline (quieter than a real mute's solid red). A folder with a soloed track in it, the tracks in a soloed folder, and FX channels stay unmarked, because they still play.
- A track you are not hearing also dims a little, in the arrangement and in the mixer: a muted track, the tracks in a muted folder, and every track a solo silences. It fades back when you unmute or take the solo off. Its M and S keys stay bright.
S and M solo or mute the selected tracks from the keyboard.
Insert effects#
Each channel has eight insert slots: four before the Morph field and four after it.
- Click + Insert in a mixer strip.
- Search the effect list and choose an effect. For a plugin in an unusual place, use Browse files....
Click a loaded slot for its menu: open the plugin's window, bypass it, replace it or remove it. Effects run from top to bottom.
You can also drag effects from the browser's FX tab onto a strip or a slot.
How the slots show#
Every channel shows all four slots before the Morph field. After it, every channel shows the same number of rows: loading an effect after the Morph field brings the next slot into view on every channel at once (up to four), so the console lines up.
Move and copy effects#
- Drag an insert effect to another slot, on the same channel or another. The chain makes room; on a full channel the two effects swap places.
- Hold Alt as you drop to copy the effect instead.
Moves keep the plugin and its settings, work during playback, and can be undone with Ctrl+Z. Automation curves follow their effect to its new slot.
Blend effects with Morph#
Every channel has a Morph field between insert 4 and insert 5 (a single row on a short mixer). Inserts 1 to 4 play into the morpher; inserts 5 to 8 come after it. The field glows in the colours of its effects, and you can drag its orb right there on the strip.
Load effects into Morph#
Click the Morph row to open the Morph window. You can put it on another monitor. Load up to four effects into its slots A to D: click a slot, or drag an effect from the browser onto a slot, onto the pad, or onto the strip's Morph row.
Blend them#
Every effect plays the same signal, and the orb on the pad blends their outputs.
- Two effects lie on a line: drag the orb left or right.
- Three lie on a triangle, four on a square.
- With one effect, the line runs from the dry signal to the effect: a dry/wet blend.
Each corner shows its effect's share. The shares always add up to 100%, so the level holds as you move. All loaded effects keep running, so moving the orb never cuts off a reverb tail. Double-click the pad to put the orb back in the middle.
Effects with different latency are lined up with the slowest one, so blending them never smears, and the track's delay compensation includes the morpher.
Click a slot for its menu: open its window, bypass it (a bypassed effect passes the signal through unchanged), replace it or remove it.
Tip: load the same plugin into several slots with different settings, and the orb morphs between its presets.
Automate the orb#
The Morph window's Read and Write keys (and the small R and W on the strip's Morph field) automate the orb.
- Read is on by default: the orb follows its recorded path by itself.
- Write records: while the song plays, hold and move the orb (in the window or on the strip) and its path is written in rose. Let go and it glides back to the path that was there before, like Touch automation.
Each recorded move is one undo step. The window draws the recorded path faintly across the pad. Right-click the pad for Clear morph automation or Centre the orb.
Morph effects, their settings and the orb are saved with the session and with templates.
Send to FX channels#
Reverbs and delays usually live on FX channels that several tracks send to.
- Click + Send on a channel (or a folder bus).
- Pick an existing FX channel, or choose New FX channel.... A new FX channel is made and the effect list opens, so you can load its reverb straight away. (You can also make an FX channel with Add track > FX channel in the top bar.)
Then:
- Drag across the send to set its level. Double-click it for 0 dB.
- Click P to take the send pre-fader: it leaves before the channel's fader and pan, so it keeps its level when you pull the fader down. P lights amber while it is on.
A small SENDS caption with a hairline separates a strip's send rows from its inserts.
An FX channel takes the name of the first effect you load into it ("Valhalla Room" rather than "FX 1"), so the sends that feed it read that name too. A name you type yourself stays. FX channels sit after the folder buses in the mixer.
Folders as buses#
A folder is a bus for the tracks in it: they play through the folder's channel, with its inserts, sends and fader. Press Ctrl+G to put the selected track in a new folder. Folders can hold folders. A folder bus can send to FX channels like any channel.
The built-in channel strip#
Every channel has a console-style channel strip built in, after its inserts and before its fader. Its modules, in order:
- Filters: a high-pass at 18 dB per octave and a low-pass at 12 dB per octave.
- EQ: four bands: a low shelf, two bells (LMF and HMF) with Q, and a high shelf.
- Gate.
- Compressor: the same compressor as Blazar Compressor.
- Tape: saturation, with drive, a tone tilt and output.
Each module is off until you switch it on.
On the mixer strip#
Between the sends and the mute and solo keys, each channel shows a chip per module (F, EQ, G, C, T), lit while it is on. Click a chip to switch its module. This section also shows a small EQ curve and the gain reduction. Drag the grip above mute and solo downward for a taller section (the faders get shorter), and the dynamics' curve joins it.
Zoom into the strip#
Press Z, or click the section, to zoom the selected channel. Its whole strip opens beside its column, the full height of the strip, in three sections side by side: Filters and EQ, Gate and Compressor, and Tape, each with its display and knobs (in two rows when the mixer is tall). The EQ's display shows the channel's spectrum under its curve as the music plays.
The zoom follows the selection: select another track and its strip opens. Press Z again, or click the fold handle along the strip's right edge (the rail with the chevron), to fold it away. In the arrangement, the same Z also enlarges the selected track.
Double-click a knob for its default. Every change is an undo step and is saved with the session.
The master#
The Master strip sits at the right end of the mixer.
- It has eight inserts of its own, for a limiter or EQ on the whole mix. They come after every track and folder and before the master fader.
- Out 1 / 2 on the master strip opens the audio settings.
- The master shows Clipping when the mix goes above full scale, and clamps the output as a last-resort guard. This is not a mastering limiter: put a limiter in the master's inserts if you need one.
Loudness and spectrum#
Beside the master, the mixer shows the master's loudness to EBU R 128: short-term LUFS in large figures, with momentary, integrated and true peak beside it, and a spectrum of the mix.
- Integrated loudness starts again when playback starts. Click the panel to restart it by hand.
- The loudness key at the foot of the mixer's sidebar hides or shows the panel.
Latency compensation#
The whole mixer stays in sync automatically, with nothing to set. Each track is played early by the latency of its longest path to the output: its instrument and inserts, its folder bus, the FX channels it sends to, and the master's inserts. Every shorter path waits to match, so dry sound, buses and sends meet in time, in playback and in exports.
The track delay's tooltip in the track header shows the amount (see Track delay).
Something unclear or missing? Tell us, or report a bug.